Build Tool
![]()
The building tool is THE most important tool in the entire mod! With it, you can place all the buildings, worker huts, and even any structure scanned by you (see Schematics) perfectly. The possibilities are endless! Watch a short video of how it works here:
Step One: Crafting
The first step is to craft the building tool. You can also get a building tool in the Supply Camp or Ship in the same rack as the Town Hall.
Step Two: Designating a Building Location
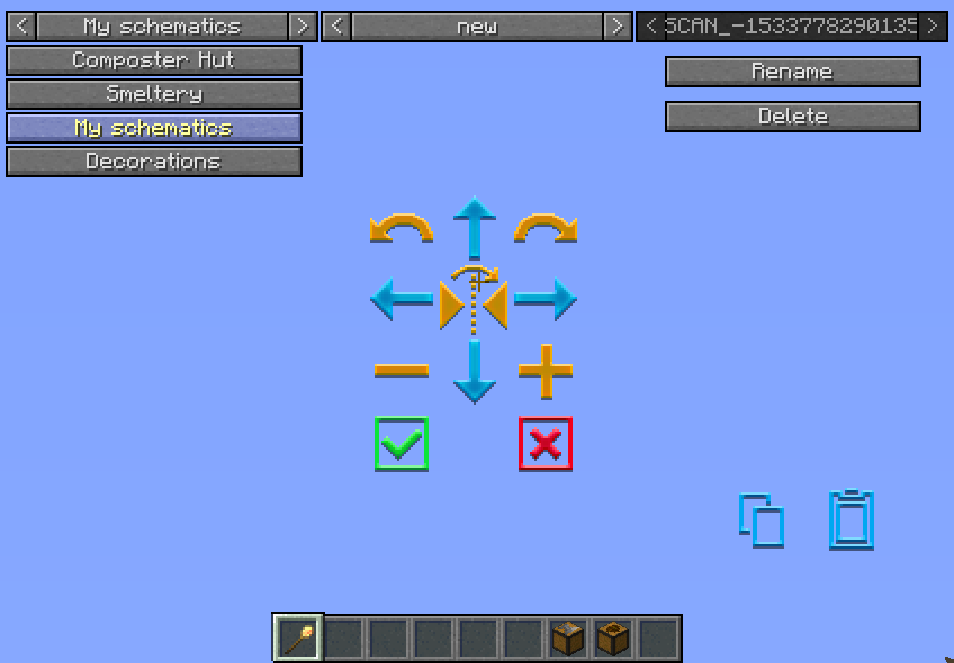
To place a worker hut or building from the mod, you’ll first need to craft the specific block for that building (see Recipes. Then, right-click with the building tool on a solid block where you want to place that building. The GUI will pop up:

Left Drop Down: Here you will see 3 general categories: My Schematics, Decorations and Huts.
- Hut Blocks/Building Blocks- When you have a Hut/Building block in your inventory it will apear in this list for you to place and view.
- Decorations- Here are several structures considered decorations that you can use and any of your own scans in this folder.
- My Schematics- In this category, you will see all the scans you have made with the scan tool. If you haven’t made any, this category will not show up.
Middle Drop Down: This is where you will see the different designs and styles of the buildings available (ranging from dwarven to asian, dark oak, and spacewars, and everything in between).
Right Drop Down: Here you will be able to see the individual schematics, depending on what you chose:
- From My Schematics- the name of the schematic (either auto-generated or if you have named it).
- From Decorations- all decorations that are of the specified style previously chosen in the middle drop down.
- From Huts- The level of the hut (previously chosen in the left drop down) from level 1 to level 5.
In the middle of the screen are the controls to adjust the structure you are about to place.
- The blue arrows are so you can move the 3D structure you are viewing (front - back - right - left).
- The orange minus and plus signs are to raise or lower the structure on the Y axis.
- The orange curved arrows are to rotate the structure left or right.
- The orange triangles in the middle are to mirror the image (to change right to left and left to right).
- The green check mark is for when you are done and want to commit to placing it.
- The red X is to cancel the whole process and turn off the ghost image of the building.
Hint: Once you have the GUI open, you can press the ESC button on your keyboard so that the 3D image will remain. Then, you can move around and take a better look at it from all sides to make sure it's the way you want it! Right-click with the build tool again towards the 3D image (on a block or in the air) to go back to the GUI so you can "nudge" your structure to the place and orientation that you want. You can repeat this process as many times as you want before clicking the green check mark to commit to the placement of the structure.
Note: When in Creative Mode, you will also see options in the lower right. The one on the left will paste it into the world completely, including all the placeholder blocks. This is useful for designing schematics. The button on the right will paste the structure into the world exactly as if a Builder had built it (without placeholder blocks).
Note: When placing a building or decoration, you will see nearby huts as if they were level 5. You will also see their outlines in blue. This is to help with planning so huts don’t overlap.
Step Three
Now that you have the structure ready to place, click on the green check mark and voilá…construction tape will appear and a build request will be created! It will automatically create a build request if it’s a decoration or custom schematic, but if it’s a hut, go into the hut block’s GUI and click the Build Options button, then Build Building, to create the build request.
You can check in the Town Hall GUI under the Work Orders (! symbol) tab to see the queue of all build requests you have for the Builders in your colony.