教程
本教程适用的前提是你已经安装了本模组或整合包。如果你想要了解如何安装我们的官方整合包,我们提供了用Twitch安装、用MultiMMC安装以及用Java(Forge)安装的教程。
简易攻略
在开拓一片新的殖民地之前,你要找到一片绝佳的位置。你需要足够宽阔的土地,能够容纳整座城市——至少8×8个区块,而且要足够平缓。 不光如此,你还需要尽可能地收集资源——包括木头、圆石、煤炭、铁、花、线、皮革、羊毛、树苗以及食物。
第一步:补给营地/补给船
当你找到建城地点后,你就需要放置一个补给营地或者补给船,二者只可选其一。补给营地/补给船中都会提供一个市政厅方块,这是你正式建立殖民地所必不可少的方块。这里还会提供建设殖民地所需的一些其他补给。当你拿到市政厅方块与建筑工具后,补给营地/补给船就只能做装饰作用了,你可以选择拆了它或者留着它。
第二步:市政厅
市政厅方块决定了殖民地的存在。它还是殖民地的中心。从此你可以使用建筑工具来放置建筑。建筑工具确保了你能在动工之前预览建筑的位置、朝向、以及它是否位于合适的Y坐标(一些建筑需要被建筑在正确的Y坐标上)。
一旦市政厅方块被放置下来,你将迎来四位初始市民。
第三步:建筑工
在一切项目动工之前,你需要一名建筑工。在建造其他小屋之前,建筑工必须首先建造他们自己的建筑工小屋,而且他们无法把其他小屋建造成或者升级到比他们自己的小屋还要高的等级。
第四步:酒馆
你的殖民地中需要有一个睡觉和住宿的地方,所以接下来推荐建造一座酒馆。酒馆允许旅客来到你的殖民地,所以你可以招募他们,他们就会像市民一样留下来。
第五步:食物
接下来你要为殖民地筹备的是食物。获得食物最快的方式是建造一座渔民小屋。你可以建造一个农场或某个动物的饲养处,但是渔民更快。如果你不想亲手为你的居民准备食物,建一座餐馆也许是个明智的选择。
第六步:林务员
如果殖民地的建筑样式是木制,推荐接下来建造一个 林务员小屋。这样你的新林务员就可以开始为你今后的建筑或工具收集木材。
第七步:矿工
石头和矿物也是殖民地不可或缺的,所以下一个合理的步骤是建造一个矿井。
第八步:仓库和快递员
At this point, you might be tired of bringing all of the resources to the Builder and taking them from the Fisher, Forester, Miner, etc. You also might want to store items in one place. Well, the Warehouse and Courier’s Hut are the solution you are looking for! Couriers transport items between the Warehouse and all of the workplaces.
第九步:接下来的部分
现在你要想清楚接下来做什么,这取决于你的玩法和殖民地的发展方向。但有几点需要注意。一旦你有了超过七位市民,就可能被raiders攻击,你可能就需要建造一个 Guard Tower;还可能有市民生病,所以需要建立一座医院;你还可能会需要一座锯木厂来制作工人们需要的物品。又或者你只是想要一个特定的工人,亦或是你找到了一个建造某个小屋的好地方。你的地盘你做主!
详细攻略
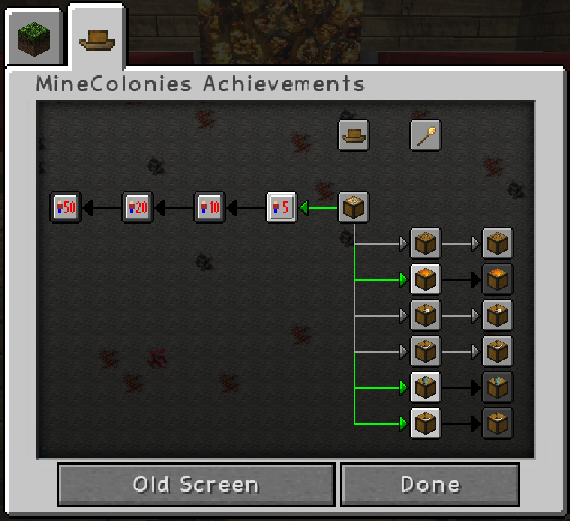
If you’re here, CONGRATULATIONS! You have already installed MineColonies and are ready to embark on an adventure to explore, conquer and establish your own colony. Work hard and turn it into a thriving town. Hone your leadership skills and grow grow grow into a city! Lastly, can you be a grand leader and finally achieve a metropolis? (Check your ingame MineColonies Achievements.)
To avoid mistakes and frustation, read through this entire guide carefully before starting to play.
补给船或补给营地的放置
To place the Supply Ship, you need to have a large enough body of water (at least 32 x 20). To place the Supply Camp, you need to have a large enough flat, clear piece of land (at least 16x17 blocks).
When you place the Supply Ship/Camp, it will spawn a chest that will contain the Town Hall block and the building tool. Once the Supply Ship/Camp is placed, you can’t place another in the world.
提示: The most important tool you will need for the entire mod is the build tool (check our build tool page). Craft the build tool so you can place all the huts and the Supply Ship or Supply Camp in the perfect spot.
Build Tool Video.
提示: If you’re not using the build tool and aren’t able to place the Supply Camp/Ship, try it block by block: one to the right, left, closer or further from the area you cleared. The area cannot contain any holes or have any flowers, grass, ferns, seaweed, coral etc.
市政厅
The protected area of your colony (once the Town Hall has been placed) will be a square 8 chunks in radius, measured from where you placed your Town Hall block the first time (Default config). Therefore, plan carefully where you want to place your Town Hall. 128 blocks (8 chunks x 8 chunks) in every direction will be your protected Town area including mountains, hills, lakes, oceans, caves, world generated structures, etc. from bedrock to sky limit.
- 注意:You can configure your own town area radius in the configuration options of the mod or the the minecolonies-common.toml file inside the
../minecraft/config/folder of your own world.
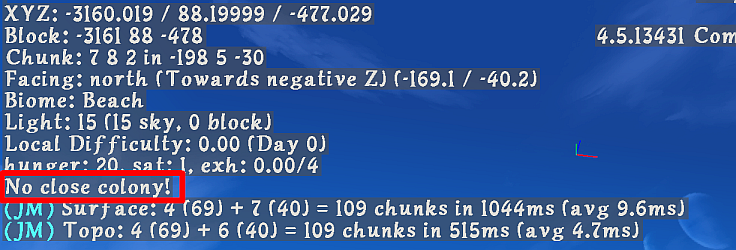
Due to the protected area of each colony, you have to carefully scout your surrounding to make sure you are clear of any other colonies nearby preventing you from placing your Town Hall or limiting your colony area in that direction (in multiplayer, etc.). If there is another colony too close to your current position, you won’t be able to place a Town Hall.
Location info of the next closest colony exits in the debug screen (displayed when you press F3). If there is a colony close to your current position, it will also show you the required distance away to place your Town Hall.
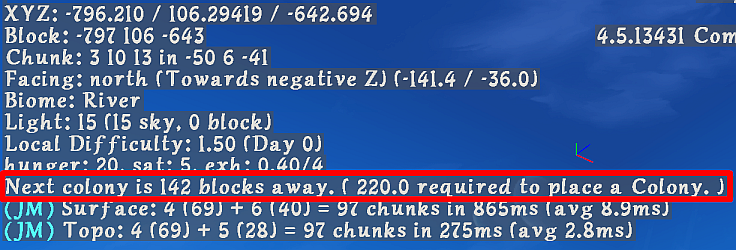

For example, in the official MineColonies server it will be the default 8 chunk radius (8 + 8 + 1 {center Chunk where Town Hall was placed} = 17 chunks or 272 total blocks required). It therefore, will tell you: “Next colony is XXX blocks away. (272 required to place a colony).”
Now, after you have explored, thought carefully, planned, and found the perfect spot to start your colony, let’s take a look at the steps to get your colony running!
建立你的殖民地
第一步
Get enough materials and craft your Supply Ship/Camp, then place it with the build tool or by right-clicking a block with it. There will be a chest (or rack) inside the placed Ship/Camp with a Town Hall block and a building tool.
提示: Gather as many materials as possible to give to your Builder when they start building. They will ask you for all kinds of materials for each building or upgrade, depending on the style of building you have chosen. The materials needed for most styles will be mainly wood, cobblestone, and torches for the lower levels. Further upgrades will require more elaborate materials.
第二步
After you have carefully decided where you want to place your Town Hall (remember, the position where you placed the Town Hall block at first will be the center of your colony’s protected area. Once placed, the area will be set and cannot be changed), use your build tool to place the Town Hall. Once you commit to the placement of the Town Hall (the green checkmark), the Town Hall block will be placed. To officially start a colony, you need to right-click on the block, then select Create New Colony. Once you’ve done this, your initial four citizens will start appearing!
You can now right-click the Town Hall block again to look at its graphical user interface, or GUI for short:
市政厅GUI
You can use the tabs on the left side to switch between different categories.
Information: This is the overall information section of the Town Hall GUI.
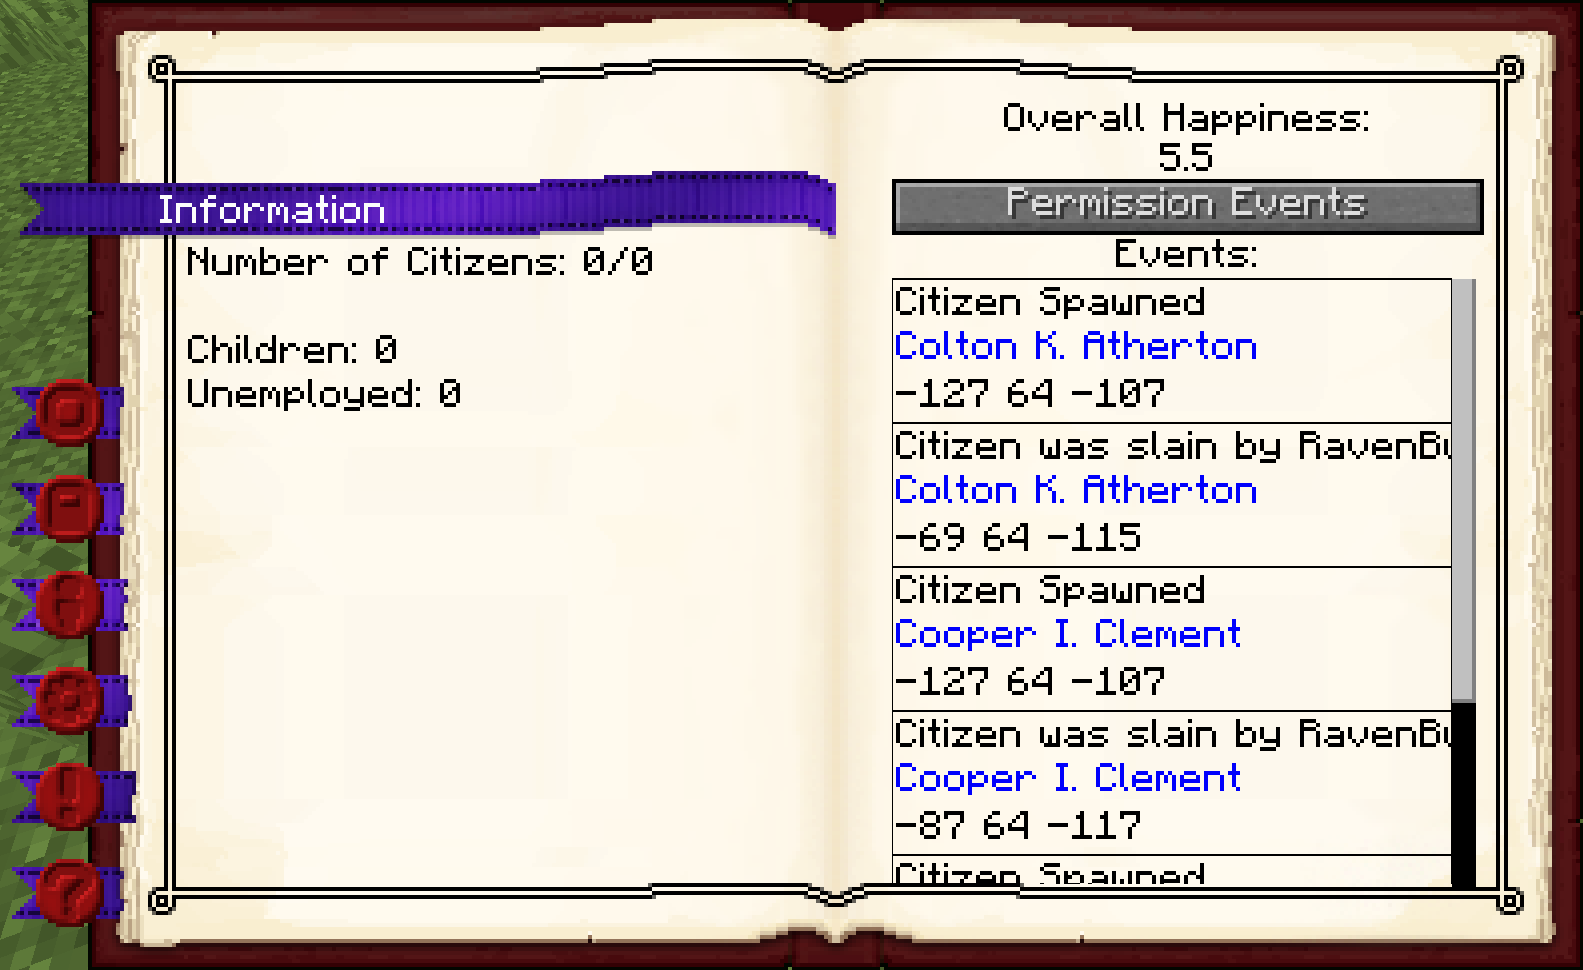
- Page 1: Here you will see some statistics on your citizens, like the number of citizens you have and if they are unemployed or workers. If they are workers, you will see what job they have.
- Page 2: Here you will see the overall happiness of the colony's citizens and any events that happened within the colony (the newest events are at the bottom). You can click the button to switch to a permission log, which will show any illegal actions that happened in the colony (like if a player tried to break a block when they aren't allowed to). Clicking the plus next to an illegal action will change it to a legal action if the player tries to do it again. For more information, see the Protection system and the Permission tab of the Town Hall GUI.
Actions: This is the most important section.
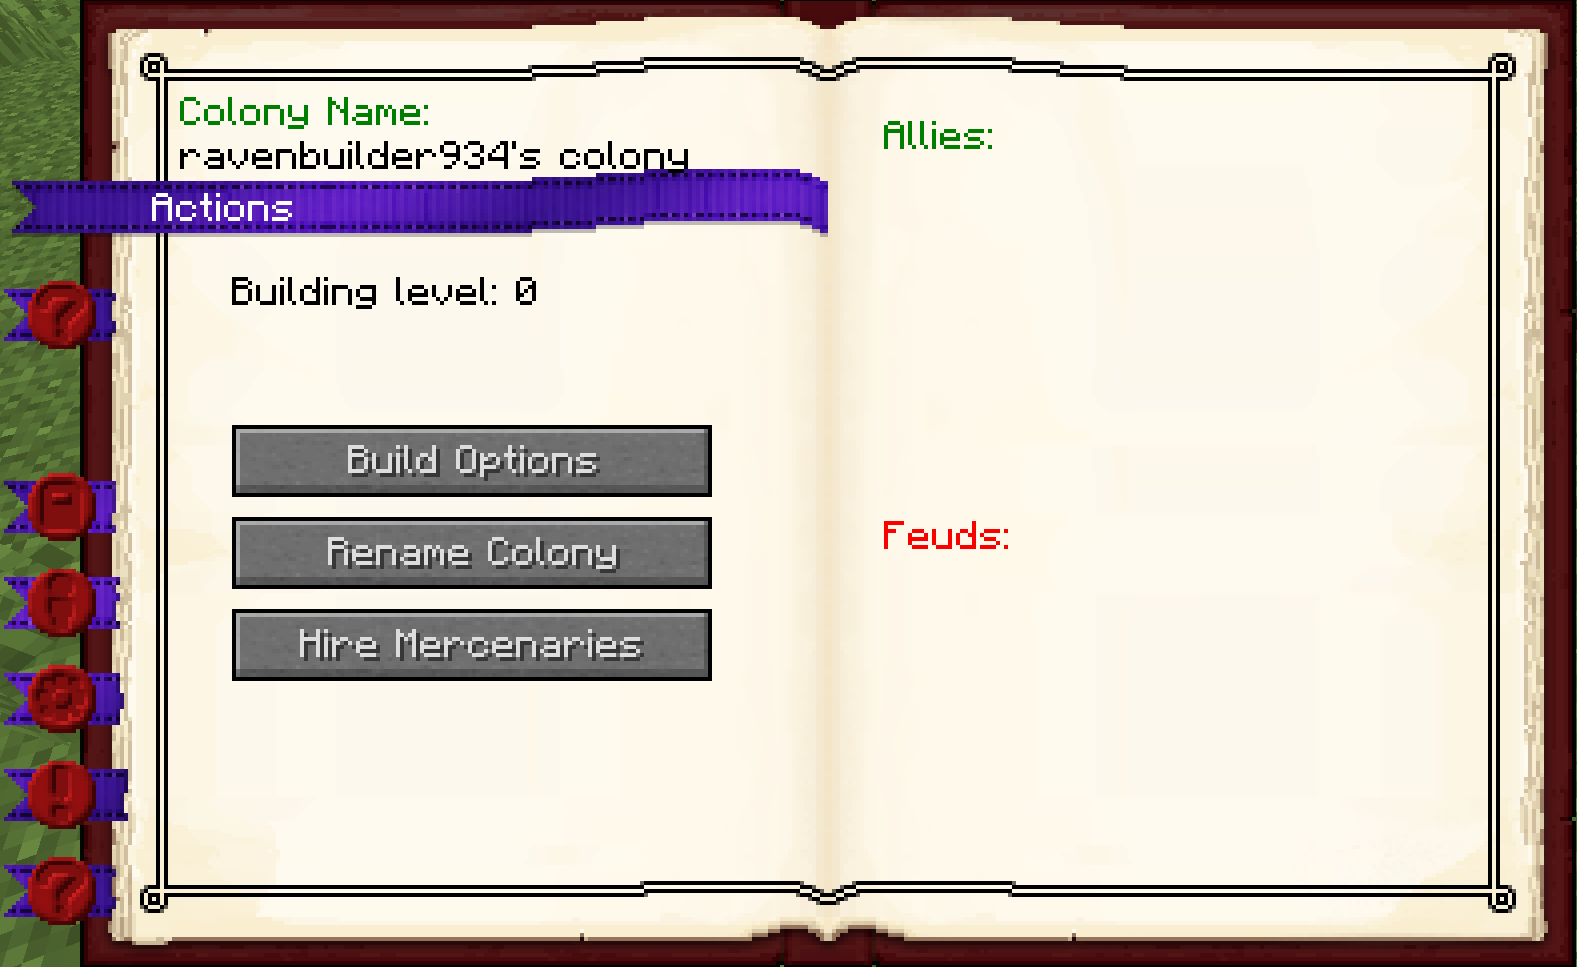
Page 1: Here you will see the name of your colony as well as the building level of the Town Hall. And the buttons:
- Build Options-Lets you create a build, upgrade, reposition, or repair build order for the Town Hall. To learn more about the building system, please visit the Builder page.
- Rename Colony-To change the name of your colony (from Your Username's Colony, which is the default) to anything you want.
- Hire Mercenaries-Here you can hire mercenaries to help defend your colony. Be warned, they're mean and will steal from citizens!
Page 2: This is only enabled if PVP is turned on in the config file. Here you have:
- Allies-Other colonies that you have added as allies and that have confirmed your colony as an ally as well.
- Feuds-Other colonies that you have added as a feud and that have confirmed your colony as a feud as well.
Permissions: Here you can invite other players to your colony to collaborate.
Permissions Pg. 1 & 2: You can add a player and give them a rank in your colony. Each rank will have certain privileges in the changeable protection system.
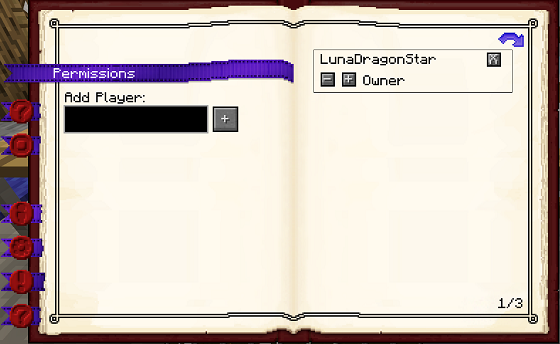
- Page 1: Here you type the name of the player you want to add.
- Page 2: Shows the list of players that have ben added as well as their current rank. You can click on the "-" or "+" to give them a higher rank or lower rank.
Permissions Pg. 3 & 4: Here you can manage the permissions for each rank.
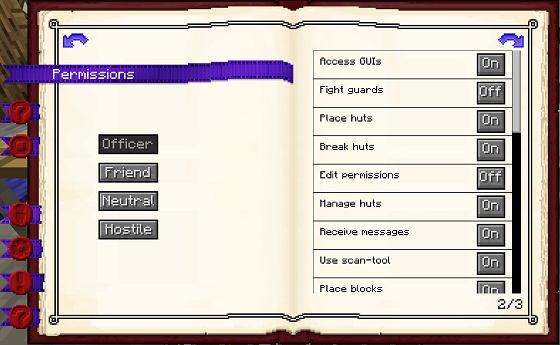
- Page 3: Here you can select the rank that you would like to manage.
- Page 4: Here are the individual permissions (for the rank you have selected on the previous page) that you can toggle ON or OFF, giving each rank the permission you want.
Permissions Pg. 5 & 6: In this section, you can add a certain block's position that will bypass the protection system for interaction. Any player will be able to interact with that block as long as their rank includes the permission 'Access Free-Blocks.'
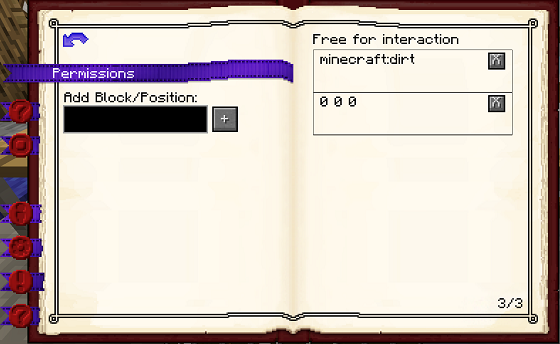
- Page 5: Where you enter the position (X, Y, Z) of the block that you want to make free for interaction.
- Page 6: Here you will see the list of block positions that you have added as free for interaction and can remove them.
Citizens: This section displays the names and skill levels of the citizens in your colony.
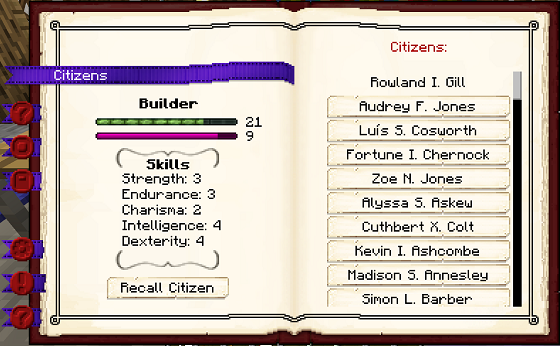
- Page 1: When you select a citizen, their stats and job will appear here. You can also recall them to the Town Hall block on this page.
- Page 2: Here you will see a list of the citizens in your colony. Select a citizen to see their skills.
Settings: This section is where you can control how your citizens will be hired and assigned housing in your colony, among other things.
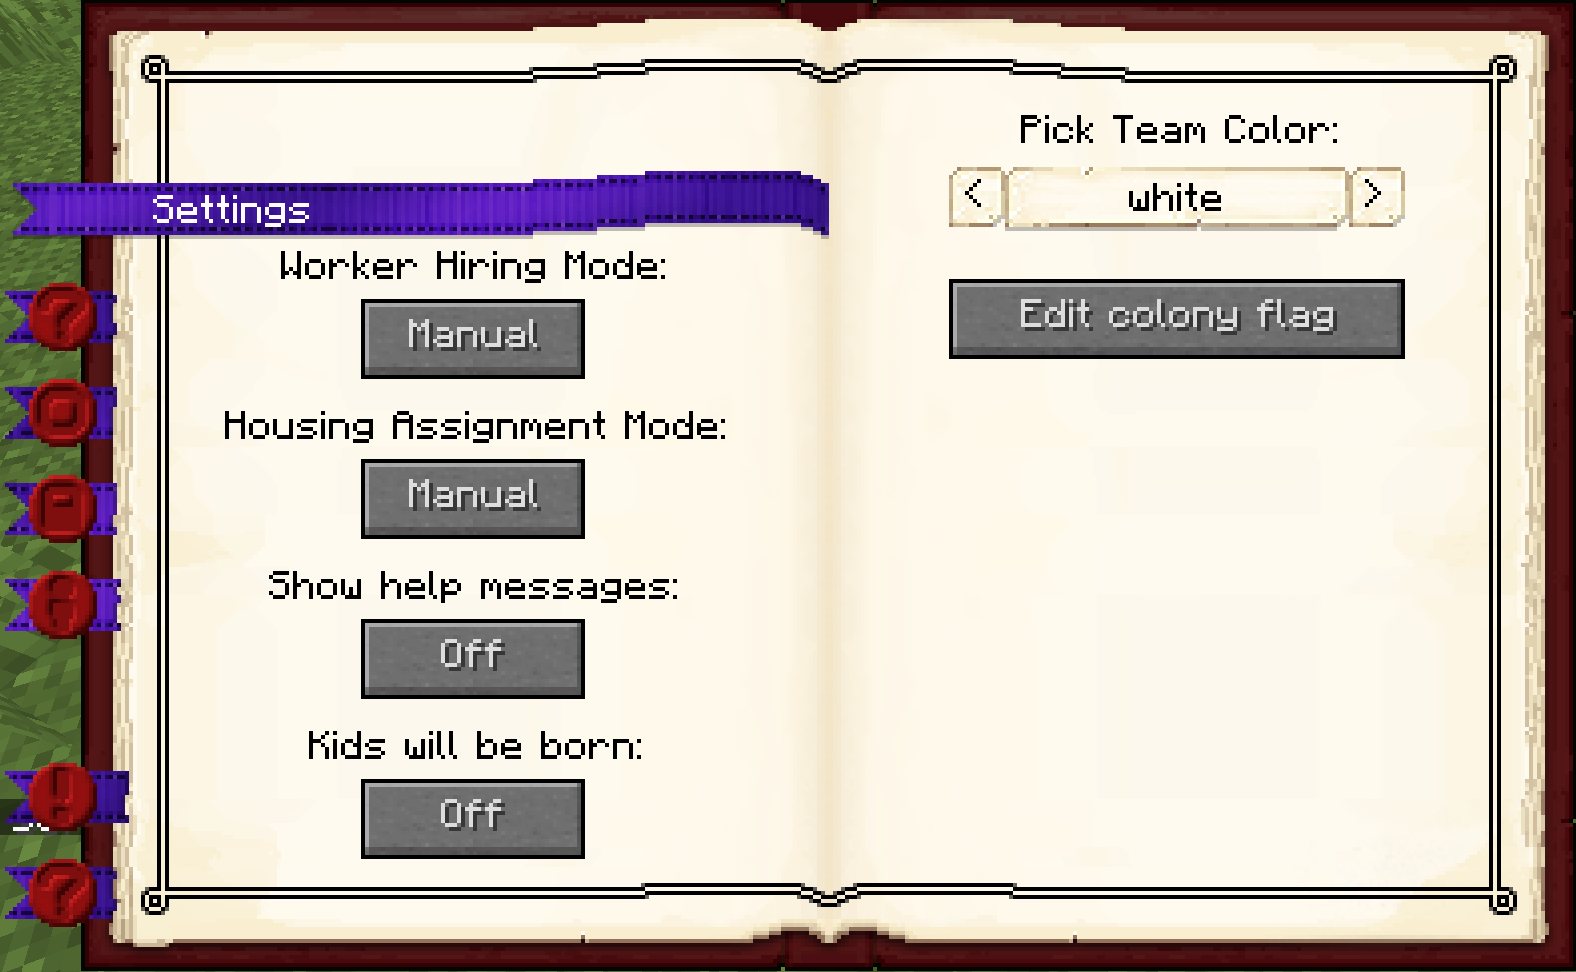
Page 1: There are four buttons here:
- Worker hiring mode: Clicking on this button lets you switch between automatic or manual. If it's in automatic mode, you can't fire or hire any citizen from any worker hut and the best unemployed citizen will be hired for you. In manual mode you will be able to hire and fire whichever citizen you want at any time.
- Housing assignment mode: Clicking on this button lets you switch between automatic or manual. If it's in automatic mode, citizens will be assigned a house as soon as they spawn (if housing is available). In manual mode, you can select which citizens will be housed in each House or Tavern. This is better if you have a large colony and many workers spread out in a large area so you can house your citizens as close as possible to their workplace.
- Print help messages: Clicking on this button lets you choose whether MineColonies help messages will appear in the chat. It is recommended that this be turned on for first-time players.
- Kids will be born: Clicking on this button lets you choose whether new kids will be born in your colony. p
Page 2: There are two buttons here:
- Pick Team Color: Whatever color you pick from here, your Guards will have a glow of this color around them when you put them in follow mode at their Guard Tower or Barracks Tower. This is for the PVP system, so you know which Guards are yours when you are fighting. Your citizens' names will also be in this color.
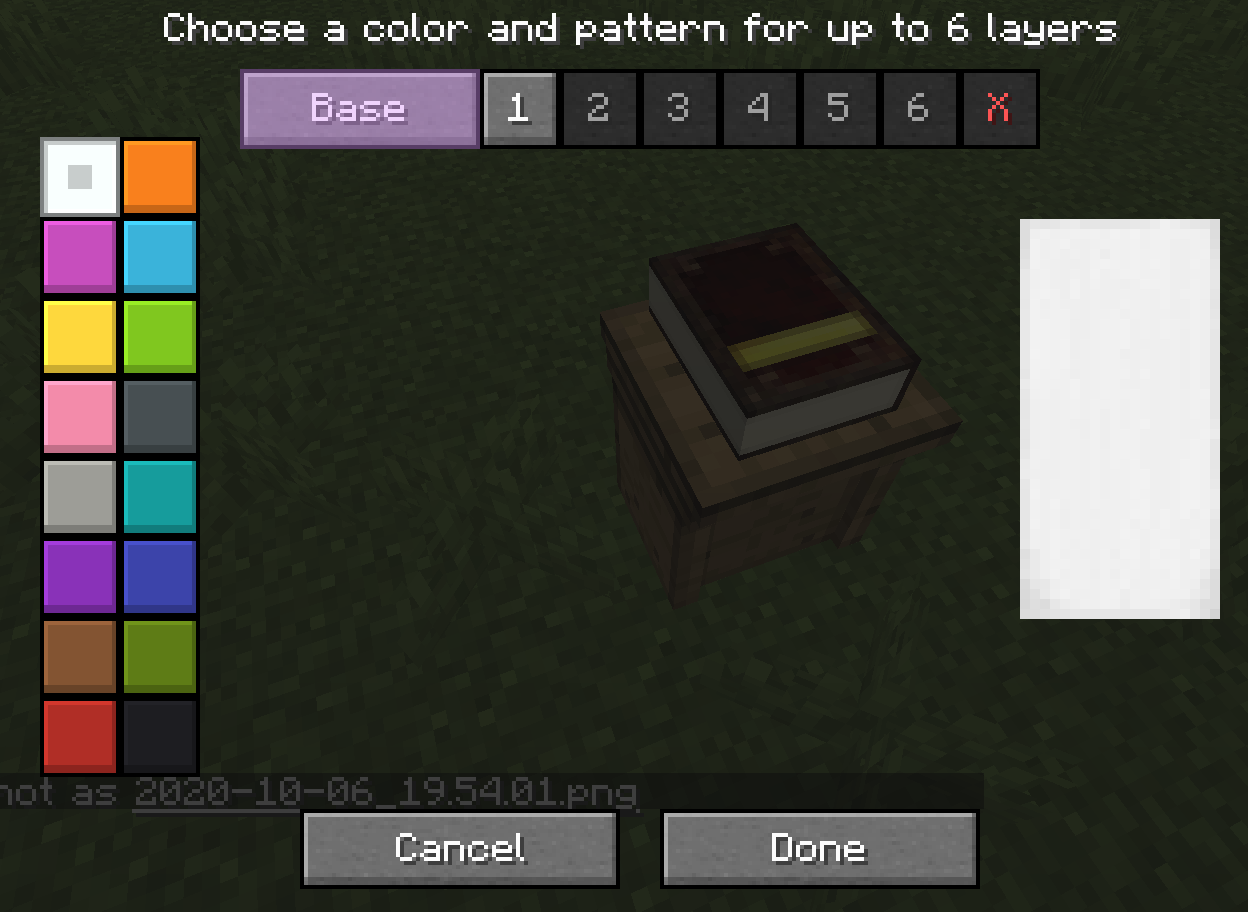
- Edit Colony Flag: Clicking this button will open up a banner designer where you can design your colony banner. Your Knights will wear the finished design on their shields, and it is also used in some schematics.
Work Orders: Here you will see the work orders your Builders have in the order they have been assigned. Builders will not start another order until they have successfully completed the top one.

- 第一页:Blank page except for the header (future use).
- 第二页:Here are all the build orders for this colony (including decorations and your own schematics as well as huts). Your Builders will complete the builds from top to bottom, and you can change the priority of the builds by moving them up or down in the list. You can also delete work orders. When you delete a work order that is currently being built, the Builder will stop building and will continue where they left off if you create the work order again.
Happiness: This is the section for the global happiness of your colony so you can see what area needs more attention to raise the happiness level.
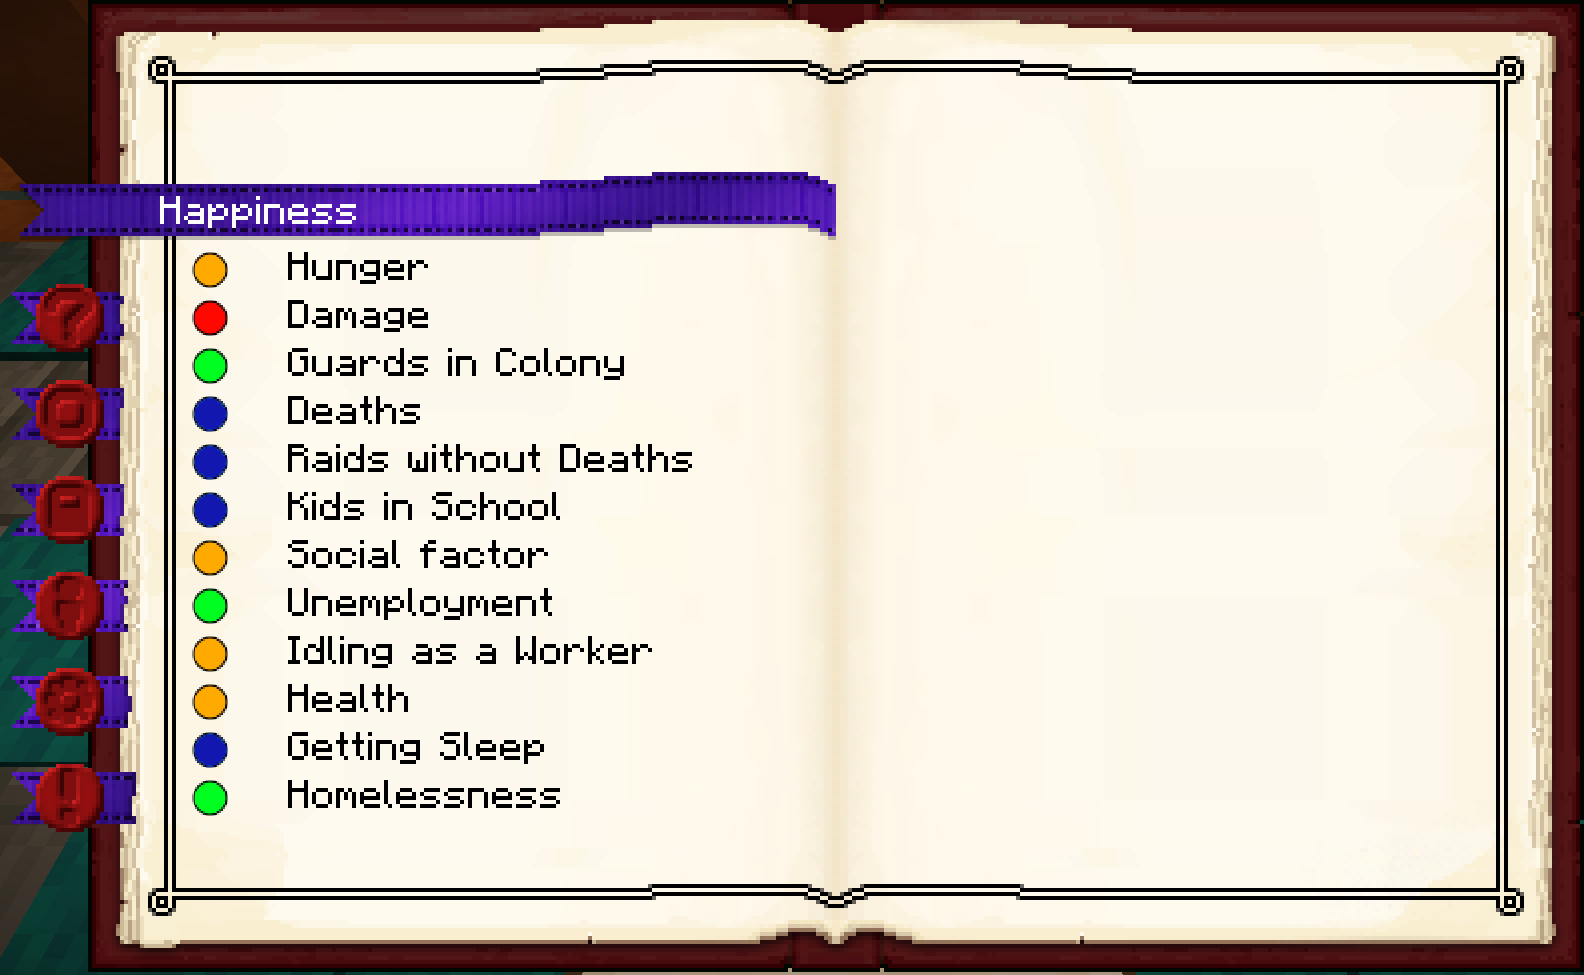
- 第一页:The happiness indices. You can keep track of the areas that will lower or raise the happiness of your citizens here. The colors, in order from best to worst, are: green (super happy), blue (happy), yellow (not happy), and red (big problem here-your citizens are definitely not happy). There's also black, which will show up if something went wrong.
- 第二页:Blank for now (future use).
第三步
Before any other building can be built, you must craft the Builder’s Hut block and use your build tool to place it. Once you commit to the placement of the Builder’s Hut (the green checkmark), the block will be placed and a Builder will be automatically assigned (or you can manually assign one with the best traits for a Builder if you changed this in the setting tab in the Town Hall’s GUI). You now officially have a Builder! CONGRATULATIONS! When accessing the Builder’s Hut block by right-clicking on it, you will see a GUI with different options:

- 小屋等级: 显示选中的小屋的种类和等级。
- 工人安排: 显示被安排在这栋建筑的工人和他们的等级。工人边工作边升级。等级越高,工作效率越高,速度越快。
- 管理工人: 你可以更改在这个小屋工作的工人。每一间小屋一个工人。注①:只有你把市政厅方块内的工人雇佣模式调为手动,此条目才能生效。否则你的市民还是只会被自动雇佣。
- 召集工人: 召集在本建筑的工人到他们自己的小屋方块边。你可能因为他们卡在某个地方,或者想看看他们有什么东西,或者想直接给他们某样东西。
- 建筑选项: 你可以创造、升级、复原、或者维修建筑。了解更多关于建筑系统的东西,请查看 建筑工 页面。
- 运输优先: 你可以设置运输工访问该小屋的优先权(当小屋内的工人发出请求时,他们会来捡起物品),或者设置让运输工不要来该小屋取物品,也可以按下【请求即刻取走物品】的按钮。
- 配方列表 教学配方: 当你点击菜单列表按钮时,将会展示你教授给该小屋的配方,也可以在此页面移除他们。点击教学配方,将会打开合成表,你可以通过这个方式将配方教授给该小屋(而不是工人!)
- 存储物: 你可以在这里打开小屋方块的存储,这里是工人存取材料的地方。他们也会使用架子和箱子,如要看看存储,也要检查看看小屋内的架子和箱子!
By pressing the arrow button in the top right corner of the GUI, you will be taken to page 2 of the GUI where you will find the following:
You will have to click Build Options on the Builder’s Hut, then click Build Building. This will give your new Builder the build assignment so they can build their own hut first. If the Builder’s Hut is not built, the Builder cannot build any other buildings.
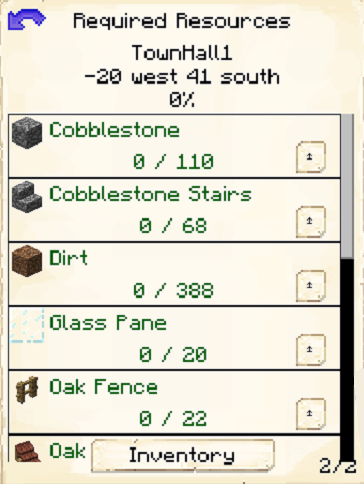
The Builder will ask for the materials they need. Right-click on them when they have a red icon above their head to see the materials they currently need.
提示: If you see that the Builder hasn’t finished a build order and you don’t see them asking for any materials, go to the Builder’s Hut, recall the Builder, and wait a bit to see what they need. Also, check page 2 of the Builder’s Hut GUI and see what resources are in red (those are missing resources).
第四步
Once the Builder has finished their hut, you’re ready to start building any other building you want! Just craft the desired block and use your build tool to place the building. Once it’s placed, go into the GUI for the new block, click Build Options, and then click Build Building. It’s that simple!
提示: Consider upgrading the Builder’s Hut to level 2 as soon as you can so the Builder can upgrade other buildings.
最终提示
现在你完成了建立殖民地最重要的步骤!
你现在可能会问,“接下来建造什么呢?”市政厅、矿井、林务员小屋、农场、渔民小屋、Guard Tower、Courier’s Hut、面包房、餐馆 and more are probably good places to start.
But you start with only 4 citizens! Now what? Well, the next step after your 4 citizens are employed and are working hard is to plan and place the House. This will give you additional citizens for each level of a House you build in your colony (after your inital four citizens are housed)! Now, what do you do with so many citizens? You cannot assign more than 1 worker per hut. Therefore, consider building additional huts for more Miners, Foresters, Builders, Farmers, Fishers, and many more!
提示:将你的小屋升级到尽可能高的等级(除了酒馆以外,所有建筑都升到5级)以获得成就(并提高工人的升级速度)。